{Blogging} Centering your Menu Bar on Blogger

The last post in my series {Blogger Tips} was on how to centre your header image/text , and today I'm going to be showing you how to do the same with your menu bar. Once you've got your header exactly where you want it, you need your menu bar to be adjusted accordingly so your blog doesn't look wonky :)

On my old blog, my menu bar (which is actually just a list of pages that I have put under my header as opposed to being on the left or right hand side) is at the top of my blog.  I have pages such as "Home" "About", "Contact" etc. 

To have your pages line up nicely with my header, here's what you gotta do:

TEMPLATE > CUSTOMIZE > ADVANCED (scroll down to) > ADD CSS 

Paste the following code and hit enter

.PageList {text-align:center !important;}

.PageList li {display:inline !important; float:none !important;}

Make sure to look at the live preview, if you're happy then click APPLY TO BLOG and there you go! Easy peasy! 

Let me know if you found this helpful!

xxx

{Blogging} How to use Pages as a Menu Bar

In the last post in this series, I showed you how to centre your header image/text. Today, I'm going to show you how to make a menu bar (so you can add information like a Contact page, About page etc).
At the top of my blog I have clickable bits of text that link you to important pages on my blog. With blogging, its important to know the different between a 'post' and a 'page. Posts are what you write on every time you want to publish something, they can be updated regularly, and are published on your home page, from newest to oldest. This is what makes up the bulk of your blog.

Pages, on the other hand are usually used for information you want to share with your readers but don't expect to update frequently. For example, an "about" page or a "contact page". You can have up to 20 pages of static information on blogger.

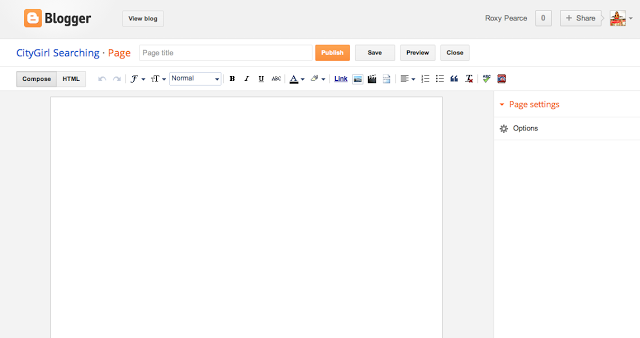
1. Click on Pages, then New Page (you then are given an option to start a blank page or direct people to a web address). For this tutorial, choose Blank Page.


2. Now give your page a title, and write what you want in the body of the page. Click Publish when you are happy with it. Do the same thing for as many pages as you need. Click Publish after each one.


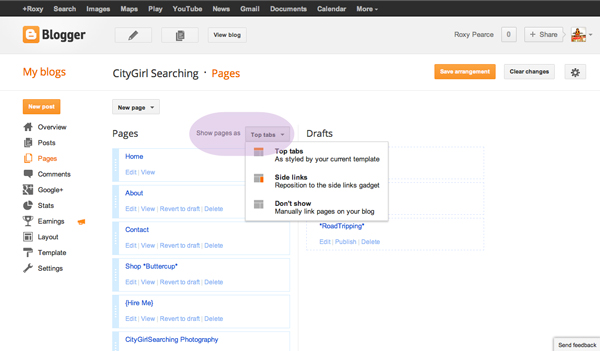
3. Select 'show pages as' and decide where you want your menu bar to be. Don't forget to click Save Arrangement.


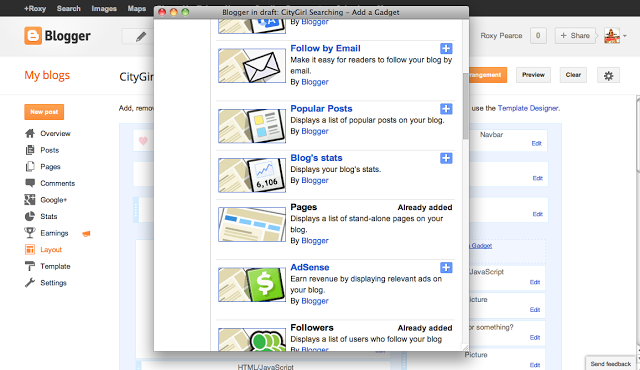
Lastly, you need to add the 'Pages' gadget to your blog to make sure your pages are visible.
Click on Layout, Add a Gadget, and look for Pages.


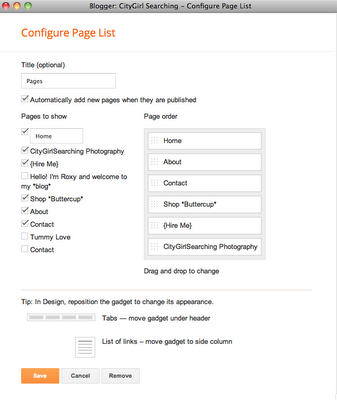
Then configure your pages. This allows you to choose which pages to show (you may want to keep some pages hidden until you are ready to make them visible). You can also change the order of the pages. Hit Save once you are done. Now you can move the pages to be where you want them on your blog. I have them right under my header. Don't forget to 'Save arrangement' when you are done!


{I will be doing a tutorial next on how to centre your menu bar...stay tuned for that!}

And there you go! I hope these instructions were easy enough to follow. I'd love to hear from you if you found them helpful :)
xxx


{Blogging} How to Centre your Header Image


The first time I uploaded a header image (instead of the default text that Blogger automatically uses when you first start a blog) I was left with an image I really liked, but some rather nasty looking 'space' towards the left. Here's how to fix that :)

1. Upload your header image (Layout > Configure Header > Upload)

2. Go to Template Designer (Template > Customize) and click on the following in the top left of your screen: Advanced > Add CSS and add the following piece of code

.header-outer {
margin-left:260px;
}

Now you will need to adjust the “260″ value, depending on how large your header is, and how wide your blog is, so just play with the number until it looks right.  (the smaller the number, the more to the left your header will move, and the larger the number, the more your header will move to the right)


And there you have it...Easy peasy :) Stay tuned for more tips and tricks to help you with your blog.

xxx

Blogging Tips {new series on the blog!}


Dear readers {friends, family and other lovely people who follow my blog!}.

 I am starting a new series here on CityGirlSearching entitled Blogging Tips which will feature simple & easy tips to help you make your blog look and feel 'better'. 

I hope this series of posts is useful to you, let me know if they are and if there is anything you are looking for in particular, and I will do my best to find the easiest and simplest way to do it.

For the time being, these tips will be {design/layout} based, there might be a few {content} based tips thrown in along the way :)

**as this blog is hosted by Blogger, I will be sharing these tips & tricks for Blogger blogs. If you are using using another blogging platform eg Wordpress, i'm afraid these tips won't be of too much use to you. But, in the future, I'm hoping to expand to include those platforms too! So stay tuned**

I will be posting the first blogging tip tomorrow!

See you then

xxx